Here’s what we should see when we have a similar link in our popup, and we click on it.
As you can see, a page opens in a new tab, but the popup stays open in the first tab. That’s only half of our goal.
If you don’t want (or need) to edit a link in HTML, check out how to use the Popup Maker close button shortcode. The close button shortcode will achieve the same thing except without writing any code.
Step 1: Add popmake-close and pum-close CSS classes
Add the Popup Maker CSS classes popmake-close and pum-close to your a tag (link tag). These classes tell Popup Maker to close a popup when we click a link that have those classes.
Here’s a demo of what we should see after adding those 2 CSS classes.
OK, cool. Our popup is closing now. But our new tab isn’t opening anymore. What gives?
That leads us to the next step. We told Popup Maker to close a popup with 2 CSS classes. The missing ingredient is to tell Popup Maker to also open the link (i.e., do the link’s default behavior).
Step 2: Add pum-do-default CSS class or data-do-default attribute
Add the pum-do-default class or use the data-do-default attribute to your a tag to open the new page.
Example 1: Here we add the pum-do-default class to open the link.
Publish or Update your popup to save your changes.
Putting it all together, here’s what we should see after doing step 2.
There we have it. The link in the popup opens a page in a new tab, and then Popup Maker closes the popup in the original tab. Mission accomplished 🎉
pum-do-default CSS class versus data-do-default attribute
Which way is better? Both and neither. They’ll do the exact same thing. It’s just a matter of preference whether you want to use a data attribute or a CSS class name.
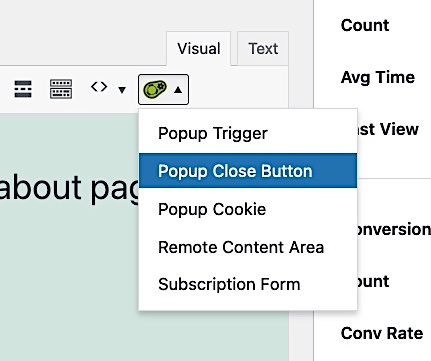
We can also open a page in a new tab and close a popup using Popup Maker’s Popup Close Button shortcode.
You can add the Popup Maker close button shortcode via the Popup Maker shortcode button menu in the classic editor’s toolbar.
If you don’t see the shortcode button menu in the toolbar, make sure your Popup Maker Settings > Misc > Disable the Popup Maker shortcode button setting is not checked (it should be off by default).
From the shortcode button menu, click Popup Close Button.
In the General tab, do the following:
Type the text for your link in Content text area.
Select a for the HTML Tag.
Enter the URL for the link in the Value for href field.
Type _blank in the Target for the element field.
Click Save.
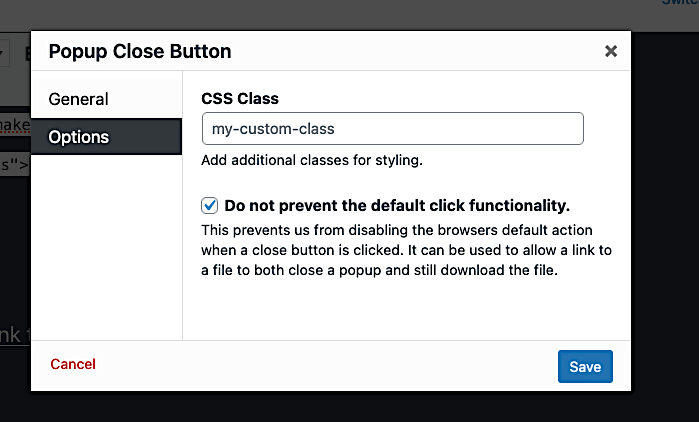
In the Options tab, check the Do not prevent the default click functionality setting (turn it on). Then, click Save.
Remember to click Publish or Update to save your changes.
This post tells you what is a cookie, how Popup Maker uses cookies, and gives you some best practices for making cookies more secure.
A Typical Scenario
Let’s start with a typical scenario.
You go to a website and sign up for a newsletter. You’re happy.
Then, a minute later, you see another popup asking you to subscribe again. Hmmm, déjà vu?
Nope. More likely, the site didn’t remember that you just signed up.
A cookie (i.e., a browser cookie) is a standard tool for websites to remember things, such as launching popups. It’s sorta like saying, “Hey, website. I just signed up for your newsletter. Please don’t ask me to sign up again 😉.”
Official Definition of a Cookie
Here’s the more technical definition of “what is a cookie” straight from the Popup Maker glossary of terms (TO-DO: Add the new backlink, OLD link https://docs.wppopupmaker.com/article/484-popup-maker-glossary-of-terms#cookies).
Cookies are small files (about 4 KB) that a browser can create on your computer to store information. Cookies help keep track of your website session.
Popup Maker lets you set up cookies to remember when popups get opened. That means you can tell Popup Maker to display a popup only once per visit (session cookie) or month. Popup Maker will check for any relevant cookies before opening a popup.
Stop the Repeated Display of a Popup
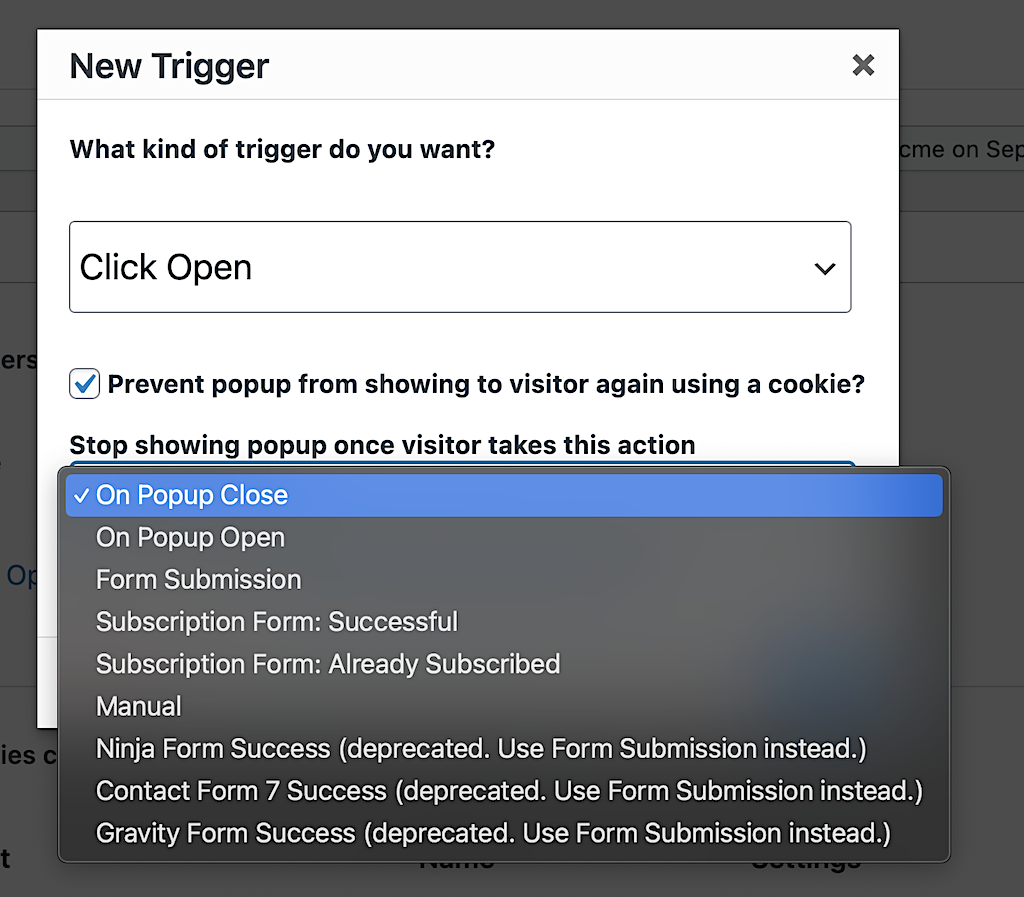
Going back to our example. When you use Popup Maker to build your popup, you can stop it from showing again after it displays the first time.
In the screen capture below, we ask Popup Maker to create a cookie once the popup closes.
When you do that, your subscription popup will always check for that browser cookie before opening. If the cookie is there, your popup won’t open.
Are Cookies Safe?
Cookies are safe when you follow best practices. Let’s look at an example and follow up with security guidelines.
Example of How WordPress Keeps Its Login Cookie Safe
For example, when you log into a WordPress site (/wp-admin/), the site stores a wordpress_sec_[somereallylongstringofcharacters] cookie. We’ll call this the “auth” cookie.
In the screen capture above, WordPress created the “wordpress_sec_e2d04861…” cookie to store:
My WordPress username
When my login “auth” session expires in seconds (defaults to 2 days)
My session ID
A doubled hash key (an algorithmically generated number) of a “hashed fragment” of my password (whew!)
That’s pretty cryptic already, and we haven’t even gotten to securing the auth cookie yet. Let’s cover that now.
Securing a Cookie Using Its Properties
In our example, securing the auth cookie boils down to setting the following properties:
Domain
Path
Secure
HttpOnly
The Domain and Path Cookie Properties
Check out the screen capture again. You can see the auth cookie is valid only for the website domain “wildebeest…” (my test site) and content under the “/wp-admin/” path.
Restricting the cookie to where it can work is an excellent way to begin creating a safe cookie.
The Secure and HttpOnly Cookie Properties
For that same auth cookie, you see a checkmark in the Secure and HttpOnly columns. Let’s explain them separately because they can be confusing.
Since this website URL starts with https, network connections to the website are encrypted or secure.
Below, we have a cookie from an HTTP site. We turn on the Secure and run JavaScript (JS) code to test if the cookie exists. We see the “Cookie exists!” success message which confirms the cookie is there and JS can read it.
A Website URL With No HTTPS (unsecured)
Here’s an example of an unsecured website URL (vulnerable to attack).
Because browsers cannot create cookies with the Secure property turned on, Secure cookies are never exposed to the MitM attack.
In this next demonstration, we have a cookie from an unsecured HTTP site. When we turn on Secure, the browser immediately deletes the cookie because Secure cookies cannot exist on an unsecured site.
The HttpOnly Property (protection against JS)
When the HttpOnly property is on, JavaScript cannotmess with it (e.g., hijack your session, steal your info, or run nasty code). That means the HttpOnly setting denies cross-site scripting (XSS) attacks.
HttpOnly Demo
In this last demo, we turn on HttpOnly and then use JavaScript to try to read the cookie. You’ll see a “Cookie does not exist message.” from the JS code even though the cookie is there. Note: This will work on HTTP and HTTPS websites because we don’t turn on the Secure property.
Popup Maker NEVER stores personal or login session details in popup cookies.
Popup Maker only uses cookies to stop showing a popup so you can avoid annoying your visitors.
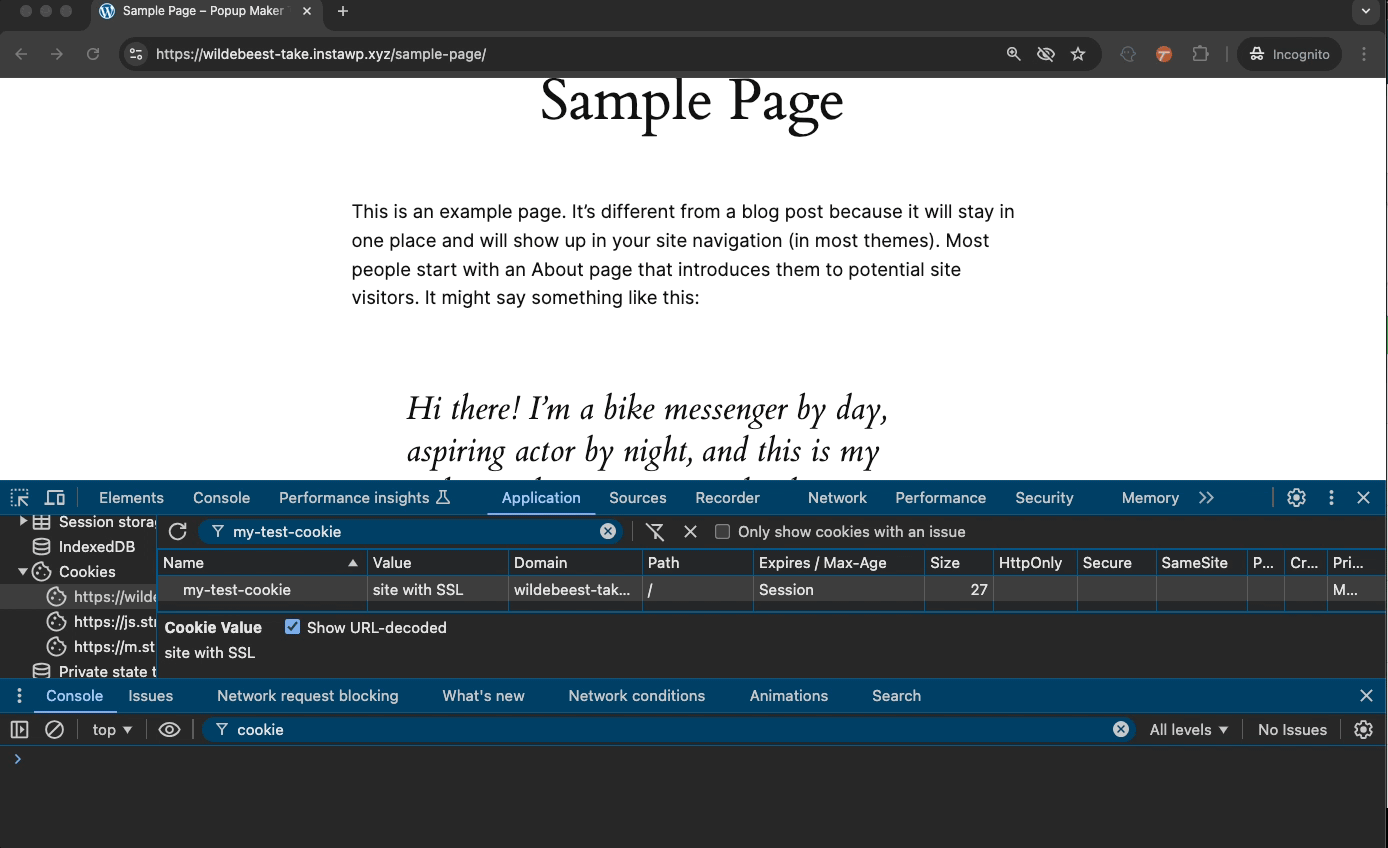
Here’s what a typical Popup Maker cookie looks like in the web browser.
Note: If you manually create a custom popup cookie, don’t set the HttpOnly flag. Otherwise, Popup Maker cannot read your cookie, and it will keep popping up for people who’ve already seen it 😬. Also, if you set the Secure flag, make sure your site has SSL to allow the browser to save your cookie.
Keep Your Cookies Safe
As you can see, cookies can store personal info or login session details. What’s saved in a cookie depends on the site you’re visiting. If a cookie with your private details isn’t set up securely, malicious people can write code to steal your data.
Cookie Security Best Practices
Here are the best practices we covered in this post.
Only store personal or login details when absolutely necessary.
If your cookie applies only to your site’s root domain, leave the domain setting blank. Leaving the domain blank allows the cookie to exist only in your website’s top-level domain (e.g., www.mycoolestsiteever.com).
Limit access for potentially sensitive cookies to only the URL path you need it for.
If you must store sensitive information, create cookies with Secure and HttpOnly turned on. Secure cookies only work on secured HTTPS sites. If you’ve got HttpOnly turned on, too, then only your site’s web server can read and update the cookie. HttpOnly cookies are protected from JS running in the browser.
This article’s featured image comes from the author.